

Upgrading my Networking Gear (2022.4)
Earlier in the series, I tackled the problem of “what if the ISP goes down” and in this update, I’m back to tackle the counterpoint: “what if the power goes out”? While we don’t get a lot of extended power outages, I do know that the utility company has some planned outages for infrastructure upgrades in the near future. Since my wife works from home, it’s important that we maintain as much uptime as possible. I have a UPS on the network stack but in this post, I’m going to work on scaling back the power draw to maximize uptime.
Networking Series
This post is part of a series, check out the other posts!
Quick Links
Starting point
In a previous update, network failover was something I addressed and generally, it works really well - during as blip, the network seamlessly fails over to cellular and comes back to fiber/cable when the connection is restored. We are in reasonable shape to deal with the next telecommunications outage but this begs the question — what if the telecoms are fine but there’s a localized power outage?
During an extended power outage, we could transition to using laptops but would still need to get network access. For convenience, and because the main switches would be powered down, the easiest way to go about this is to drop down to a single access point and all the critical devices can connect wirelessly. One limitation of my current networking stack is just how much of it needs to be powered on to implement this. Here, I’m referring to the number of devices (and their associated wattage) that I need to support with a UPS:

Currently
Router (ER7206), 9W max
10G Switch (TL-SX3008F), 15W max
1G Switch (TL-SG3428X), 24W max
Main AP (EAP-225), 13W max
Fiber ONT, 9W max
Hardware controller (OC300), 15W max (optional)
PiHole (Raspberry Pi 4), 6W max (potentially optional)
Not counting any power conversion inefficiencies, my UPS would have to provide somewhere in the neighborhood of 70-91W (using maximum power draw values) just to provide Wi-Fi to the house. According to CyberPower’s runtime calculator, this should give me 1.5-2 hours of runtime. Anecdotally, this is consistent with the actual runtime I was seeing during power outages but more is always better right?
I set a mental goal of at least 4 hours runtime so that Wi-Fi uptime could keep up with the runtime of the laptops on battery power and all of this, without expanding/upgrading my UPS at this time. As such, the only way to eek extra runtime out of the network-stack is to reduce its power draw.
Enter Endurance Mode.
Endurance Mode
With Endurance Mode, I wanted to cut out all the devices that wasn’t crucial to providing basic Wi-Fi coverage to the house. The easiest way to swap the entire network stack out for a single travel-router; the travel-router already has a built-in Wi-Fi access point, but depending on where I place the travel router (likely magnetized to the side of the rack), it’s very likely that signal quality throughout the house won’t be great. So I’ll plan for possibly [re-]using an existing access-point to provide house-wide coverage.
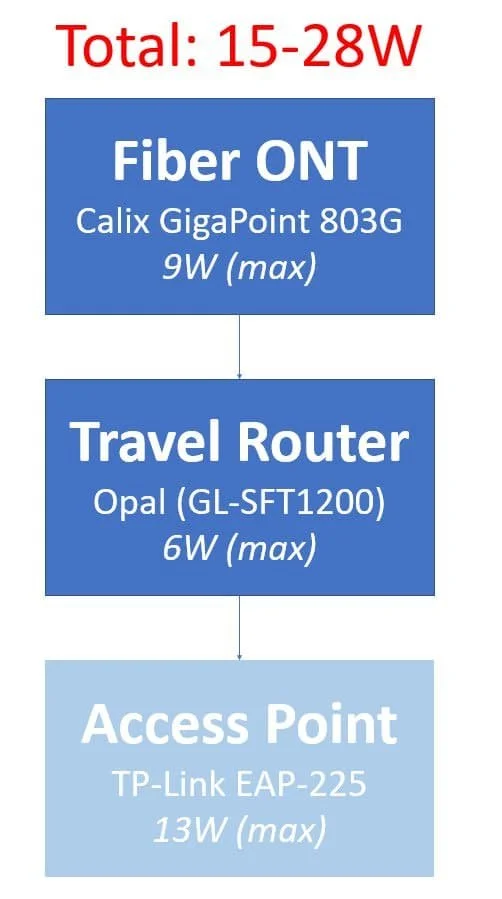
Endurance Mode
Fiber ONT, 9W max
GL.iNET GL-SFT1200 travel router, 6W max
Main AP (EAP-225), 13W max (technically optional)
Beyond reducing the power-consumption, there are two soft-requirements for this project:
To minimize the amount of additional network gear ($) required to implement this and,
Make it so the actual process of cutting over is dead simple: during a power outage, I want to be able to cut over in seconds and I want the process to be brainless
Thinking out loud...
When I say keep the process simple, I mean that I don’t want to be fumbling around, unplugging and replugging network cables in the dark — everything should be pre-connected and ready to go so that it’s just a matter of flicking some switches.
At a high level, I wanted to find a way to fully connect both networks and use power-switches to control which set of equipment was live - something like this:
At a high level, this is pretty straightforward — except those tricky red lines…
When I built the Network Rack Mk 2, I specifically went out of my way to put everything on independent power switches to facilitate this: during an extended power outage, I could toggle the power switches to turn off all of the blue devices and turn on the grey devices; after a quick network drop, we would be able to carry on our day with laptops over wireless. The magic sauce is in the dotted-red lines— a way to simultaneously connect two Routers to a single connection port on the Fiber ONT and also to connect my main access point to two devices at once.
Implementation attempt (and failure!)
If you search online, you can find a plethora of “ethernet splitter” type devices. They all come with very obvious caveats and disclaimers:
This Ethernet splitter allows two computers to share one Ethernet line ONE AT A TIME, but it DOESN'T SUPPORT Both computers to connect onto the internet Simultaneously. Just ONE output port is working.
Please note-the output port of this RJ45 network splitter does not support two computers connected to the network at the same time. Only one output port is working at a time.
The splitter cable expand one RJ 45 outlet to two standard 8P8C design. Please noted that only one port could be used at one time.
It does not support two devices to access the internet at the same Time. Only one device can be connected to the internet at a time.
So far so good. I specifically only want one network to be powered up at a given time anyways, so this is perfect! Being a sucker for this, I bought two of these too-good-to-be-true dongles: one to split the connections for the routers and one to split the connector to the access point.
Spoiler: if this looks too good to be true, you’re on to something…
On paper, this looks like it’s a perfect fit for my needs: during normal operations, the blue devices are powered on and the grey device is off — which meets the requirement of only having one device connected at a time. During endurance operations, the blue devices power down and the grey device powers up, also maintaining the single-device requirement.
This did not work as intended, I couldn’t get either port to work consistently (in the manner I wanted) and in the limited scenarios I could get it to work, the signal was reduced from 1000-Mbit to 100-Mbit. Obviously this is a stupid flop. This entire category of products almost feels maliciously labeled as ethernet splitters.
So what gives?
The big clue is the drop to 100-Mbit. When you look at these devices as ethernet mux/demux, it makes a lot more sense. So under the hood, ethernet cables generally have 8-wires running in them. For gigabit (or faster) networks, all 8-wires are utilized however, an older (slower) standard only requires 4-wires. With this bit of extra knowledge we can surmise that under the hood, these devices are splitting a [faster] 8-wire connection into two [slower] 4-wire connections.
So these “ethernet splitter” devices need to be bought in pairs (which is not always evident in product descriptions) and they drop your line speed to 100-Mbit (which is also deceptively ignored in most of the documentation). A better label would be to call it an ethernet multiplexer/demultiplexer (or compressor/decompressor)
How these ethernet splitters “work”…
The takeaway
Just don’t buy these types of products. They are too good to be true and will never do what you hope they will.
New plan
I originally balked at adding a switch to the picture because of the additional power draw but I stumbled upon the D-Link DGS-105 unmanaged switch that uses an astonishing 1.85W (and is wall-mountable which is a bonus); this way I can keep my normal-router and travel-router plugged in at all times, toggling between them using power switches.

One downside of this plan is that I need to have a dedicated access point for endurance mode (added cost). Finding a solution for the access point is a bit more complicated. I have a few options:
Do nothing, just use the built-in wi-fi on the travel router. This costs me nothing (power-wise) and initial tests suggested that it does have an astonishing broadcast strength in ideal conditions, where I plan to mount the unit (magnetized to a sheet of steel), the performance will suffer substantially
Get another dedicated EAP225 (13W). I know the entire [wireless] network can be driven off a single EAP225 and this would be one of the cheapest (money and power) option
Move my current EAP225 (13W) to be used in endurance mode and get a new access point to use as my ‘main AP’
This last option now lets me consider getting the first WiFi 6 (or even 6E) support in the house. There are a few candidates:
EAP690E HD - 51W(!!), WiFi 6E, quad-band, massive throughput, not available yet
EAP680E HD - power values not known yet (guessing 40W), WiFi 6E, tri band, not available yet
EAP660 HD / EAP670 - 22W, WiFi 6, dual-band only
EAP610 / EAP620HD / EAP650 - 15W, WiFi 6, dual-band only
Ultimately, I settled on the EAP690E HD as it was the no-compromise, check-all-the-boxes option. At time of writing, it’s not available yet, but I wanted to get everything ready so that, if the product reviews were positive, I could simply buy it, install it and be done. This is where I ran into the only (amusing) hiccup. The AP is damn huge. I was planning on stuffing it into the drop-ceiling, between joists but at over 11” in diameter, the specific spot I was planning on, didn’t work out.
I opted to move the AP location to a nearby spot and threw together a quick platform to simply place the future AP (for now, since the EAP225 is acting as my ‘main’ AP, I have that wired up there).
Platform that can support the bigger access points (and give me easy access to it, if needed)
For the time being (while I wait for the access point to be released), I’ll need to do one additional step of moving the access point from the main network to the endurance network (and then back, when the power is restored). Once the AP is released, this won’t need to be done.
Looking ahead
As a follow up to Project Endurance, I’d like to look at splitting up the UPS coverage for the network to provide dedicated power coverage for certain devices (i.e., each NAS to be caught by a dedicated UPS).
The next network purchase will likely be the TP-Link EAP690E HD (again, assuming no glaring issues with reviews) followed by a router upgrade. The router I was waiting for, the TP-Link ER8411 is due to be released soon but I’m not in a rush to transition since my ISP doesn’t yet offer faster-than-gigabit speeds anyways.
Of course, in a never ending push of technology (and father time), my current main NAS (DS1817+ with 10G) is definitely getting long in the tooth, particularly re: running VMs — I really want to have VMs running off NVME SSDs for the next NAS, so this is something that I’ll need to keep an eye on over the next few years. In the meantime, I think I’d like to get a 2x10G NIC for my NAS so that I can keep the 2.5G (or less) traffic from congesting the 10G flow. While I’m in there, I might upgrade the fans in the NAS to Noctuas not because I’m having issues with the stock fans but to get in front of issues that will inevitably come along.
Network Update (2022.3)
In the previous installment, I finish getting the ethernet runs in place and get basic DNS sinkholing setup with Pi-hole.
Product links may be affiliate links: MinMaxGeek may earn a commission on any purchases made via said links without any additional cost to you.