

Integrating Work-Laptops into a High-Performance Flow
Working from home became a reality for a lot of people due to COVID-19 and this brings with it a bunch of pros and cons. The obvious upside is that you might be able to get away without wearing pants, but that likely comes at the cost of getting stuck using a… laptop (—ugh). If you are lucky enough to have access to high-performance [work] computing, then consider me envious! In this post, I’ll go over the challenges of integrating a work machine into my workflow (for context, see my Wall-Desk) and some of the hacks and workarounds to try and make the experience less, frustrating.
Quick Links
Motivation
As a power-user, this meme particularly resonated with me and pretty much summarizes how I feel about business-class laptops:
It’s one thing to go to a workplace and use the supplied equipment and it’s also fine to use the same equipment at home on a limited basis, but full time? Blegh! Almost universally, we can say that work-machines are extremely underwhelming. Sometimes it’s a case of patently ‘bad gear’ (i.e., low-powered, mobility-focused hardware) and sometimes it’s entirely ‘enterprise bloat’ (i.e., using Microsoft Antivirus, Cisco AnyConnect etc.), but more often than not, it’s a bit of both.
For context, my work-machine happens to be a Dell Latitude E5500. At a glance, we have
i7-8665U (4c/8t, 15W)
32GB of DDR4-2400 CL17@2T
As a consumer-oriented laptop, it’s firmly in the ‘not-bad’ category; but in a software-development environment, the 15W power limit on the processor is what hurts the most. Depending on your corporate IT policy, you have a variable amount of enterprise-bloatware before we can actually use the machine — and then when we pile on the software we actually need to do our jobs, it’s no wonder the machine comes to a crawl.
If this describes your situation, here’s a tip: don’t try and understand it. Yes — it could be as frustrating as “the purchasing manager liked the wallpaper on the demo laptop” (excuse me while my eyes unroll from the back of my head…).
It’s crazy how much performance you leave behind when you are singly focused on mobility - and it’s doubly frustrating when almost everyone uses these laptops docked up and plugged in as poseur desktops, eliminating the whole point of optimizing travel & mobility argument for most companies.
Ranting aside, the best we can do is make the best of the situation: in this post, I want to explore some ways to integrate my mediocre laptop into my existing desk and IT infrastructure. Before we explore too deeply, I have two additional unique points:
My laptop comes with Thunderbolt which is neat, except the driver regularly pukes causing the machine to just completely lock up requiring a hard-reset. Ask me how I know that you need to hold the laptop power button for 12-seconds to hard boot the machine….
This is entirely self-funded so I don’t plan on getting the official Dell Thunderbolt Dock ($500!) or any other Thunderbolt dock for that matter since, well, Thunderbolt is a stupid crutch that would have been a non-issue on an actual desktop…
Integration Goals
When I built my Wall-Desk, I allocated a drawer to permanently leave my work laptop with the goal to run this laptop in headless mode (i.e., screen closed) and I would ‘use’ it by remoting into it via VNC using my real computer.


I went with the remoting route for two reasons:
I was not going to build out a dedicated station for this machine, not because I didn’t want to but because the work-machine is not worth the effort/expense as it’s simply so low-performance (spoiler: this theme is going to come up a bunch)
I did not want to have two sets of keyboards/mice/audio/video at my desk. I’m lucky in that I use the exact same set of keyboard & mice everywhere I go so the muscle-memory never really changes. Something like a USB toggle switch to share/redirect peripherals between machines could work but it’s a non-starter for me because:
A USB toggle switch offers my machine no additional value
My USB ports are keystoned into the wall and the odds of finding a keystoned/wall-integrated switch are almost nil
Even if I was willing to consider adding a peripheral ‘hook up point’ for the work-machine, the additional keystones and cables aren’t cheap (again, with the self-funded…)
The way I look at it, this work-machine is a guest in my workspace and as the guest machine, it will bend to my norms of my workspace. This is doubly-so because of the embarrassingly bad performance of the machine — if the machine was more performant, then it would make a bit more sense to spend some time/money to accommodate it.
At the end of the day, remoting into the machine is virtually transparent which is great; since everything is a local ethernet connection, this isn’t a huge surprise. There are some pros and a few (substantial) cons with this method, so it might not be for everyone.
Challenge 1 - Connecting Monitors
Connectivity Limitations
Almost all laptop users will be familiar with ‘the standard connectivity limit’:
2x 4K displays, or
1x 5K display (if you’re lucky), or
1x 6K display (if you’re lucky) or
Connecting to 8K (forget about it ha!)
Options
My Wall-Desk originally had a triple 4K setup and assuming I wanted to connect the monitors directly to the laptop, the connectivity limitations left me with only a few not-great options:
Connect all 3 displays but run (one or more of) them at a lower resolution: Ha! If you’re okay with running them at a lower resolution, this may be the easy way out. For me this is a non-starter because I always want more resolution, not less. The option of having mismatched resolutions is never fun to work with either so that was a no-go
Bring over 2 out of the 3 displays (at 4K): this is a non-starter since it’s just a fancy way of saying ‘which side of your neck would you like to be sore’
Bring over only 1 of the 3 displays: this initially sounded absurd but there’s no neck pain, I get the full resolution (up to 4K) and I don’t have to worry about janky mismatched-resolutions
Of these options, connecting one display is the most appealing; obviously, there’s a huge downside of only having one monitor but in a comical twist of fate, it’s alleviated by the fact the machine is so underpowered that it’s less impactful than I initially thought (i.e., being able to see multiple displays worth of screen real-estate if the machine is choked out anyways).
Additional Complication
For my computer setup, I exclusively run DisplayPort cables and the laptop doesn’t have any DisplayPort ports (there are two on the Thunderbolt dock, but I’m not about fork out a boatload of money for one). My cables are permanently routed inside the wall-desk and adding additional cabling and connectivity (at personal cost) to support hooking up a weak-laptop didn’t make any sense.
It’s a bit anticlimactic but ultimately, figuring out how to most optimally connect my monitors to the work-laptop was irrelevant since I had already decided (when I built the wall-desk) that I was going with the remoting option because integrating a system that would accommodate the laptop wouldn’t have been worth the added expense.
[Back to Top]So how does this work with VNC?
So with VNC, the resolution of the session is tied to the resolution of the equipment physically connected to the machine you are connecting to. The work-laptop has a 1080 screen, so no matter what, any VNC session will always be at 1080. To get a higher resolution VNC session, I have to connect a higher resolution display to the laptop.
Enter virtual display dongles.
You can get virtual display dongles in DisplayPort, VGA, DVI and HDMI flavors but HDMI is by far, the easiest to find and work with. Although I’m normally a fan of HDMI for PC hookups, this isn’t as big a deal since these are just dongles that don’t ‘go anywhere’. To the computer, it appears like any other display and you can configure whatever resolution you want (up to 4K). The entire flow is really straightforward:
Connect the dongle(s) to the work-laptop
Once the device is initialized, it will display as a generic monitor: set the resolution to whatever you desire (up to 4K)
In the case of laptops, set the display to the ‘external screen only’ (optional, but makes the most sense)
Now every time you VNC in, you get the desired resolution that was set
Repeat for every HDMI port you have available — although you are still subject to the ‘standard limit’ (i.e., 2x 4K displays).
VNC will ‘flatten’ all of the available monitors into a single ‘surface’ to send to the client and there can be some interesting applications of this: because the entire remote experience is contained within a single application, you could condense multiple [remote] monitors into a single [local] monitor, potentially without losing any real resolution. For example, you could attach four virtual dongles, configured at 1080 and merge that into a single 4K remote session.
Interesting Option
I briefly considered getting a super ultra-wide monitor (32:9 aspect ratio) an using VNC to flatten a whole bunch of virtual monitors (in portrait mode) into a single 3440x1440 screen. I would have considered placing this dedicated monitor below my main monitor array, angled upwards: this way, the monitor remains ergonomically within view.
This was more of a whimsical thought-experiment as [a] I didn’t have enough of a gap below my monitors (only about 10”) to fit a useful display, [b] the monitor would interfere with my center speaker [c] most ultra-wide monitors are curved (- gross) and most importantly, [d] expensive as hell.
When using this setup, the first downside of having the remote monitors ‘flattened’ you may encounter will be that actions like “move this application to the next monitor” won’t work as intuitively as you were used to or that devices connected to your local-machine won’t ‘flow-through’ to the remote machine; beyond this, day to day use via VNC will mostly be transparent, which is great.
[Back to Top]Challenge 2 - How to Handle Meetings
Online meetings and calls can be a bit tricky when you are remoted into your work machine rather than being directly connected. There are three broad ways you can go about connecting to your meetings:
Physically connecting equipment (microphone/headphones/webcam) to the remote machine and joining the meeting via the remote-machine. This option has the advantage of generally being the least fussy since all of the fussy components are directly connected to the meeting as ‘normal’
Double-joining a meeting from both your local-machine and your work machine: this has the benefit of allowing you to use the existing equipment (that is likely to be connected to the local-machine) but also having access to the remote-machine for file/screen sharing
Join meetings only using your local-machine and, if the need to share your desktop comes up, pipe the remote session over
The first two options are fairly straightforward and generally but come at the cost of either desk-clutter and/or some fussing around for every meeting. The final option requires a bit of setup upfront but you have everything dialed in, can be equally straightforward to use. Specific to my use-case, I didn’t want my calls to be interrupted by random lockups from the stupid Thunderbolt driver crapping out, so the less I would rely on the work machine to anything, the better.
Getting setup
Join the call: Connecting to the call is pretty straightforward: most modern platforms have some kind of web-view (or you can even install the meeting client on your local machine as well). Assuming you can authenticate, joining the call is the easy part. In the case of Skype, I actually prefer the web-view because the standalone app is constantly being updated and needs to be restarted all the time.
Using software like OBS, with VirtualCam you can create your own ‘webcam’ that calls can access
Using video capture device source, you can pull in a video stream from a webcam or similar — you can even have multiple video capture device sources to put together a multi-person/cam setup or have your own picture-in-picture
A display capture source allows you to specify a specific application to display (i.e., you can share the VNC Client window)
A window capture source allows you to share everything on a specific local monitor (be careful! ha)
A color/image/slideshow source allows you to create a video stream from that specific source — this is handy for having on the top most layer; by having it come up, in front of everything, you minimize any chances for Oops camera or screen-sharing events!
You can certainly combine one or more of these elements together in a layered manner; any source that might include audio can also have it’s volume independently controlled.
The biggest benefit from all of this that you don’t need to ask to share your screen — you just do it. If your work has you bouncing around different meeting platforms, streaming your desktop as a webcam pays off even more: you only need to configure this once and the behavior is the same on any meeting app. Even when sharing, you can create a picture-in-picture by overlaying what your webcam see onto what is being streamed — just like if you were sharing your screen natively. The only downside is that you can’t easily share a specific window/application on the work-laptop.
Challenge 3 - How to Handle Files
Most of the time, sending and receiving files isn’t a big deal — except if you’re transferring files during a call. The most reliable way to work around this is to share a common space that you can access from both your local machine and the work-machine. There are a few ways to do this:
Play the USB drive game and physically transfer the file from one machine to another (or use a USB switcher)
Map a drive from one machine to another and write the files there
Map a share on your own network share that both machines can access
Certain VNC client/server combinations will allow you to transfer files directly over the clipboard - this can be a bit unreliable if the clipboard suddenly gets overwritten by one machine though
Of course, if you can double-connect to a meeting, you can always skip this grief and send/receive files using the work-machine while you continue on with your presentation on your local-machine.
Tip: If you’re going through any of the “map a share/drive” — if you use the same drive letter, any shortcuts or references you might use will be transparent regardless of which machine you’re accessing the shortcut from .
[Back to Top]Challenge 4 - Ok what if you really do want to share (only) a specific window?
By using a window or monitor source, we can configure OBS to only show that location but that will apply only to the local machine. If, for whatever reason, you want to tighten up your share and only show a limited amount of content from the remote machine, we have two options, neither of which are super great.
The first is to use OBS to pull the entire VNC stream (or local-monitor) in and crop/position/cover the elements we don’t want to show; the second workaround is to have VNC selectively stream only what you want to show. Both options have their pros and cons and you could also combine both of these together as well. Using OBS to selectively hide elements is pretty straightforward, but using VNC to selectively stream content can be pretty powerful. Support for this will vary based on the specific VNC server implementation; but using something like TightVNC, it is possible to set a very specific set of coordinates to pipe over the VNC session (by default, all of the displays are flattened and sent as one).
To do this, we will need to:
Determine a space on your remote machine that you want to use as the streaming space — anything that appears in this area (regardless of what application it is), will show
Configure the server to pipe only that location when a VNC session is initiated using a specific port
On your local machine, open a VNC session, specifying that port and the VNC session will automatically scoped
In OBS, create a windows source to select the new port-specific VNC session


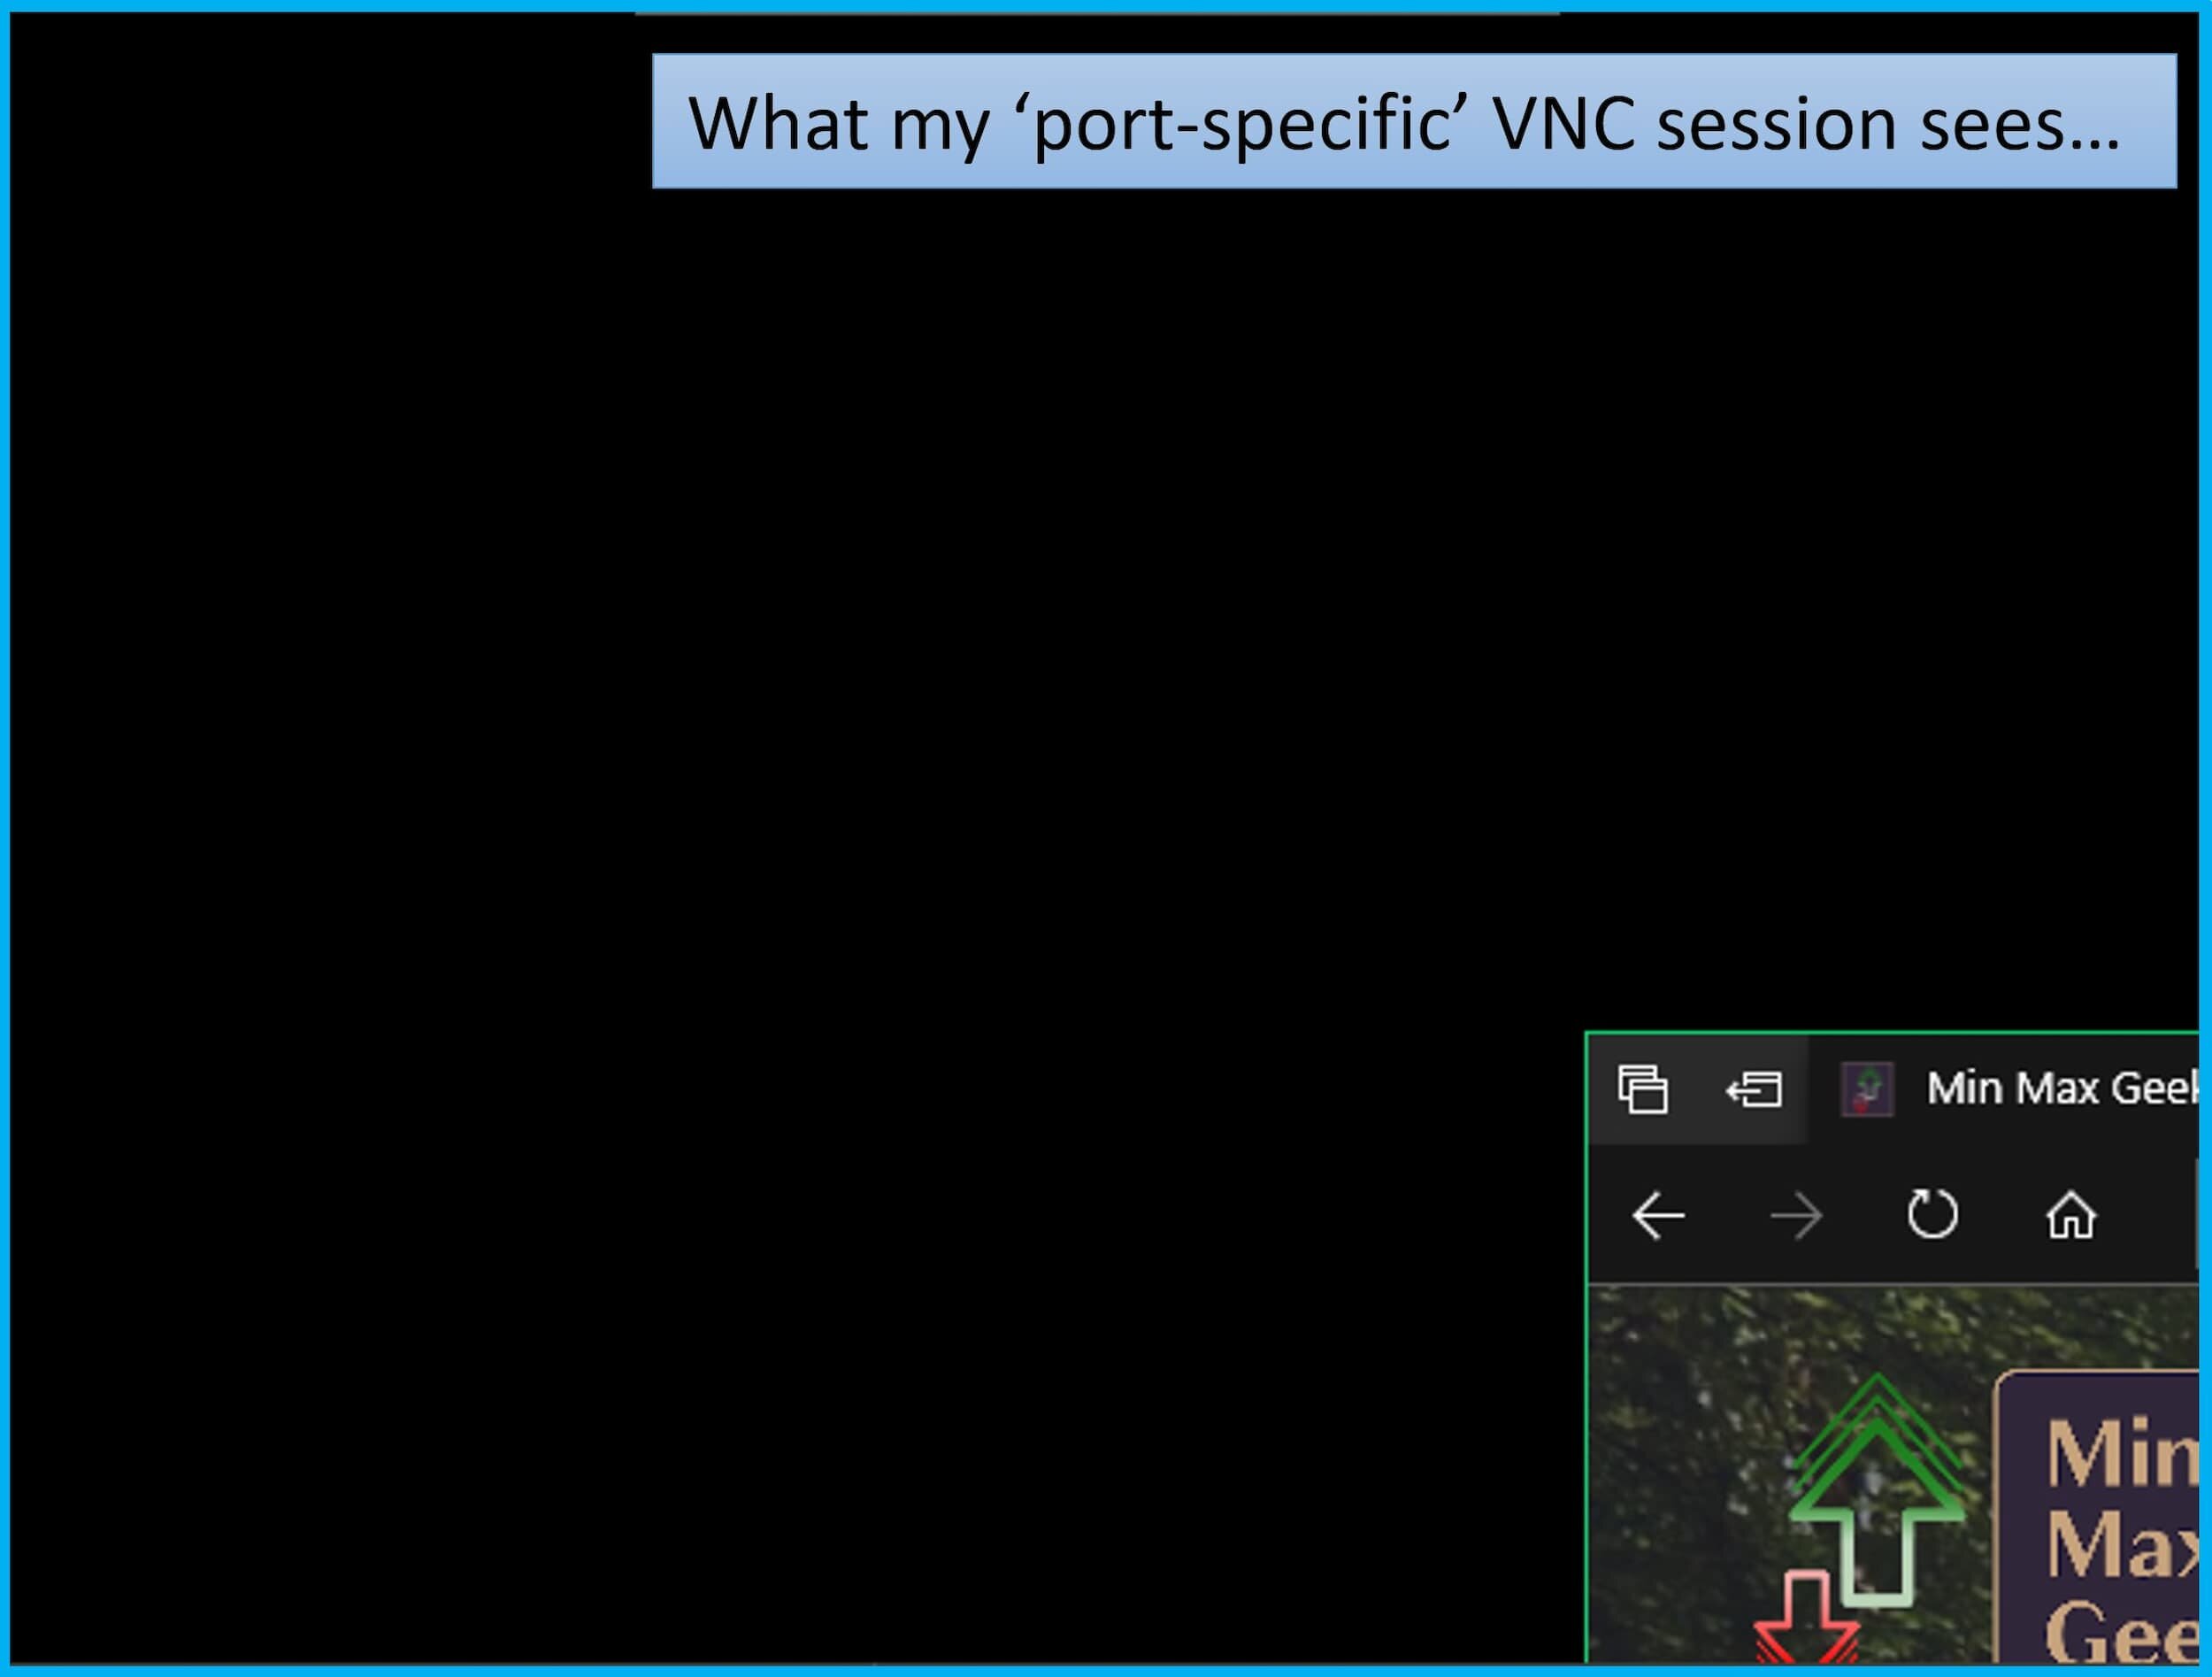
Note that TightVNC will faithfully pipe anything that is visible in the specific coordinates to the VNC Client — so be cautious of any pop-ups or stray windows! To be safe, you can use a transition ‘loading’ screen.
At the end of the day, this isn’t a great way to do it - truthfully, it’s pretty poor (you may have better luck if you can pipe applications over a remote session but even that is a hail-mary). For me, it ended up being worth it to build my workflow around this limitation up front.
[Back to Top]Equipment I use to integrate my laptop
As part of the wall-desk, I allocated a drawer for the work laptop. To try and ‘simplify’ this, I wanted to use some kind of a dock or hub where I could just connect using a single USB-C cable to the laptop. After all, docking with a single cable is the whole point of this kind of endeavor right?
I tried a couple USB-C hubs which worked, but weren’t really ideal for this kind of setup. I settled upon a CableCreation hub that had all of the features I wanted:
It had USB PD so I could pass up to 100W of power downstream to the laptop
It had a gigabit ethernet port
It had a HDMI port in case I wanted to connect another monitor
I wasn’t really planning on using it but, it even had some USB ports and some SD card slots which were a bonus
Since I wanted to ‘permanently’ install this USB-C hub into the drawer, to hold it in place, I used 3M Command Poster strips (aka ‘Command Strip Velcro’). If your plan is to permanently install a hub in place then, in addition to considering the ports and features that you think you might need, be mindful of the orientation and placement of those ports. Most hubs seem to have:
A (male) USB-C (going to the laptop) on one of the sides of the hub,
If present, an ethernet on the opposite side
USB-C PD power input on the ‘top’ side
So right off the bat, three of the four sides need to be accessible. In many cases, the HDMI port will be on the opposite side as the USB-C PD port which means that if your drawer is relatively shallow, you will either have to place the hub ‘face down’ or sacrifice the HDMI port.
The size and design of the drawer can also play a factor in your setup:
In hindsight, if i had built this drawer taller, I could still velcro the hub to the side/back of the drawer and still ‘access’ the bottom side of the USB-C hub.
Since the drawer is relatively confined, consider leaving a substantial gap between the drawer fronts and/or a large air-gap at the rear in order to maximize access to air
Since this is a laptop, it’s destiny is to overheat and throttle, but if you put the laptop upside-down, you’ll give the intake fans at least a fighting chance…
To optimize this further, I used a right-angle USB-C adapter to reduce the profile of the incoming power cord and then using an inline-magnetic USB-C adapter to make the connection to the laptop a quick-disconnect (right-angle magnetic adapters exist as well)
Note: when looking for magnetic USB tips, get the “full sized” (lots of pins) version — these will deliver power, data and connectivity. The more compact ones are suitable only for charging and maybe light data transfer


With this setup, when transitioning to work-mode, I just turn the laptop on, close the drawer (or if I’m feeling generous, I can keep it partially open) and connect from any of my machines using VNC. Since I control all of the hardware for all of the stations, regardless of what station I connect from, the user experience will be very similar.
[Back to Top]Tips, Tricks and Common Questions
Why VNC? Why not something like Remote Desktop which is built-in? In some environments, RDP may be disabled but more importantly, connecting via VNC does not boot the existing user-session from the machine and you can authenticate at the login screen, and the connection will be the same regardless of whether or not a VPN connection is established, or drops, etc. If you’re using a non-windows OS, VNC tends to lend itself better there as well
What do I need to be able to VNC? You will need a Server which is installed on the machine you want to remote-into (i.e., work machine) and some kind of Client that is installed on the machine you are remoting-from (i.e., your personal machine). This means that
You will need to be able to install and/or run software on the destination machine - this may be something that is locked out due to company policy and/or technical limitation
You will need to be able establish the network connection: this can be blocked at the firewall level, or malware like Cisco’s AnyConnect VPN which can be configured to disallow concurrent networks
Does it cost anything to run VNC? Generally, the VNC client will be free; for the VNC server, there are free options available, such as Tight VNC
What are my options if I absolutely cannot install [VNC] software on the work-machine? Hopefully, you can fall back to something like Remote Desktop (or another means of remote connectivity); if you don’t have any means of connecting remotely, you’re going to be hosed for any kind of workaround — hopefully the machine has enough horsepower to be worth desk-space
Is there any way to clean up my screen share? Make sure to make use of hiding the desktop icons (don’t forget you selected this!) or even multiple virtual desktops; if you want to take it one step further, you can configure a custom port for VNC to only screenshare a specific (virtual) monitor — if it’s the secondary screen, you will likely have less icons and clutter there (and notifications won’t show there by default, reducing the chance for oops-events). You can also configure VNC to black out your wallpaper when a client connects
One (or more?) of my screens is showing up as black! This can happen if you are connecting to a machine that has HDR/10-bit color enabled (and this problem may be different depending on the specific VNC server that is running). In the case of RealVNC specifically, to work around this, you’ll need to make a change: Options —> Expert —> Set CaptureMethod to 1 (more info). This will allow the 10-bit monitors to render over VNC at the expense of using CPU polling to do so
Switching to a non-accelerated CPU mode for rendering
Can we leverage Thunderbolt in some way? In theory, we could hook up a Thunderbolt GPU enclosure ($400-500) and throw a real video card into it and then we can be rid of the “standard limitation” of 2x 4K screens. In fact, 8K (and multiple 8K) becomes an engineering possibility if you throw enough hardware at the machine; alas, I don’t have a whimsical-spending fund to try this out…
What resolutions do the HDMI dongles support? 4096x2160, 3840x2160, 2880x1800, 2560x2048, 2560x1920, 2560x1600, 2560x1440, 2048x1536, 2048x1152, 1920x1440, 1920x1200, 1920x1080 are the relevant resolutions. So looks like 16:10, 16:9, 5:4 and 4:3 resolutions are supported — if you’re rocking a super-mega-ultra-wide, then you’re out of luck for now. Support may vary for different dongles, these are the ones I use.
Is the laptop really that bad? As a product you can buy and use, I guess it’s not terrible: the hardware is what it is and as a credit to our IT team, the amount of enterprise bloatware is actually fairly low. But that is not a very “aim high” way of looking at things — I look at the cost of the device and compare it against what I could do with the same budget. And I certainly would not be looking at laptops - after all, we all use them in a docked, desktop configuration anyways. The usual, “you’re paying for mobility” angle is moot — if the machine is worth lugging around, I’ll gladly lug it around regardless of it’s bulk.
Did I really use just one monitor? Absolutely! I have access to browser-mode for email and IM so I can run both of those on local-screens which reduces the monitor-needs on the work machine. For the longest time, I ran with just a single virtual dongle and everything was fine: at the end of the day, (unfortunately!) it’s still the computer that is the performance bottleneck. Several months later, I switched to using two virtual dongles to bring two 4K screens over VNC but, since I don’t have access to all of my “move this app to the next monitor” and “minimize/restore/maximize this window” keyboard and mouse macros (since those macros don’t fully transfer over VNC), I’ve tweaked my workflow to leverage using the available resolution real-estate from a single display.
Other than the side effects of ‘remoting’ into the work machine, are there any other downsides? There are a few that come to mind:
If you need to use web-UIs that are not built around higher resolutions or eccentric aspect ratios, you’re in for a humorous, albeit less than stellar experience. This is doubly-fun if you are connecting with ultra-wide monitors: for one of our web-apps, the “new entry” and “submit” is a comical 42” apart; even on a more normal screen, the buttons are 16” apart
When you’re “sharing your screen”, if you have your stream set to broadcast at 4K then users with 1080 screens will likely complain that everything is small. You can work around this by setting your stream to output as 1080
[Back to Top]Summary
I give laptops a lot of flak simply because they aren’t high-performance desktops and that’s not entirely fair - laptops have come a long way over the years and with the advent of things like USB-C and even Thunderbolt, then realm of what can be done on a mobile platform is pretty awesome. That being said, most of the consumer- and business-class laptops have never prioritized performance in any way. It’s all about emphasize aesthetics, the multi-year tech support and brand cohesion — all things that market very well to non-techies.
If you’re looking for outright performance, or even performance per -degree, -dollar, -weight, or -footprint laptops will almost always disappoint. In some ways, performance per-watt may tip in favor of laptops although ultimately, we are looking to try and best integrate a relatively low-performance device with relatively high-performance surroundings. With enough infrastructure, planning and (let’s be honest), effort, it’s quite possible to [partially] overcome the performance and usability limitations of these laptops and make the whole experience bearable.
At the end of the day, we’re looking to improve the general usability of the work machines. In my case, the priorities were to leverage as much of my existing infrastructure as I could without introducing additional clutter and to offset the impact of having the Thunderbolt driver causing a system lock-up randomly throughout the day.
Product links may be affiliate links: MinMaxGeek may earn a commission on any purchases made via said links without any additional cost to you.