

A New Phone Adventure
To make tech support and maintenance easier on me, both my wife and I use the same phone (happens to be the OnePlus 7T which we nabbed a few years ago for a great price). Generally speaking, we have no complaints with it although now in 2022, it’s just starting to get a bit long in the tooth. OnePlus published what I thought was a fairly reasonable maintenance/update policy back in 2021 where their flagship-tier phones would receive support for 3-major android releases and security updates for 4-years.
The phone launched in 2019 with Android 10 and as such, I would expect that support would go to Android 12 and/or 2023. At the time of writing, Android 12 is in beta-testing and we’re rapidly approaching the 2023 cutoff for security updates. I had a plan to upgrade the phone(s) in 2023 sometimes (depending on what models were on sale etc.). My wife’s luck had different plans though and she had the misfortune of cracking her phone screen with the most insignificant of drops.
Or maybe it’s an excuse to buy new phones. I’ll never say.
Quick Links
'Recovering' the old phone
By the time I got to the phone, the AMOLED had leaked everywhere and almost the entire phone was blacked out. While we could walk away from phone with relatively little data loss (at most, 2-days worth of content not backed-up), how hard could it possibly to access/use a phone almost totally blind? Right?
I was hoping that it was just a visual problem — that I was just working blind. My plan was to fire up my identical phone and walk through the process with the two phones side by side and eyeballing where I had to touch on her phone. No dice, almost the entirety of the touch screen was non-responsive as well: there was only about a postage stamp worth of responsive touch screen in the bottom right corner. We got really lucky that the selfie-camera was not impacted by the broken screen I was able to use Face Unlock to get into the phone. By touching the screen every so often, I could keep the lock screen from triggering.
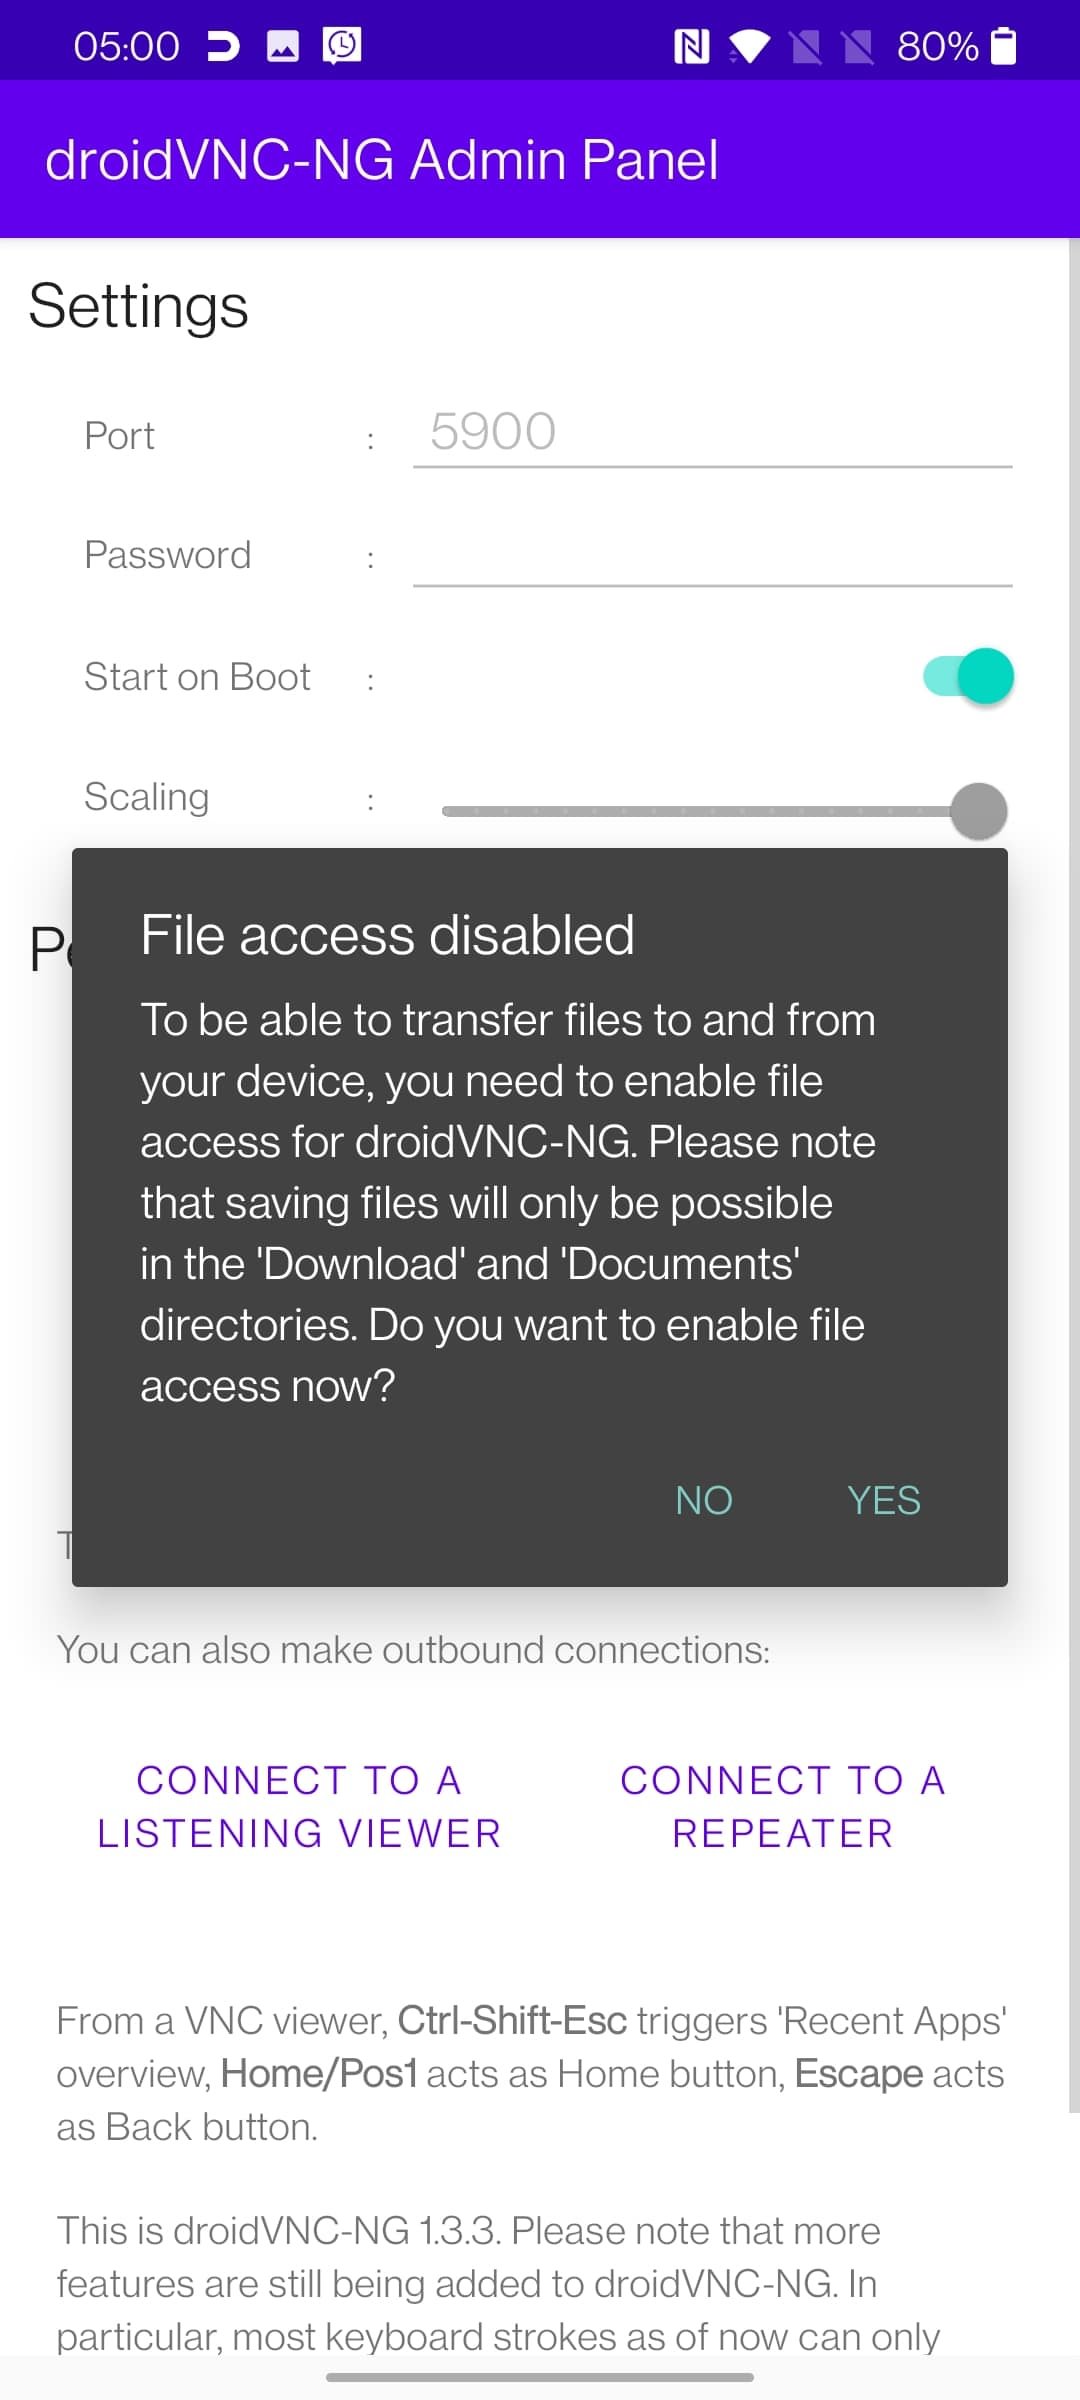
I was able to remotely install apps to the phone; specifically, I went with droidVNC-NG. I was hoping to use voice activation to launch the application (since I would have no way of launching it via the screen), but due to the ‘odd’ name of the app, we couldn’t figure out a way to get OK Google to voice-launch the app. Luckilu, I happen to create a folder on the desktop in the bottom right and my launcher allows me to ‘Add Apps’ to this folder. The second stroke of luck was that the ‘Add Apps’ interface is a single-column list of app the apps. Of course, finding the app in this list was still a challenge but as a third stroke of luck, the app actually has a longer name: droidVNC-NG Admin Panel — and I was just barely able to make out the text in a small patch of visible screen. By connecting a keyboard to the OTG port, I was able to add the app to the folder.
I had to briefly switch back to a mouse in order to launch the app because the app icon was placed ever so slightly outside of the still-functioning touch range. Getting the app launched only a small step into the journey — an app like this requires a whole bunch of permissions! From here on, I switched back to the keyboard and bounced between the two phones side by side, counting how many tabs it took to select focus on the elements I wanted to select before pressing [enter] to click it:
Click the START button
An accessibility popup would show —> figure out how to click YES
This would then take me to a list of installed apps —> find droidVNC-NG from this list and click on it
This would take me to the [accessibility] details page of the app —> find a way to toggle the accessibility switch to on
This would trigger a confirmation popup —> find a way to click ALLOW
Clicking ALLOW just applies the setting and dismisses the popup — I’m still stuck in the app-details page and have to find a way back to the droidVNC-NG app
Getting back into the droidVNC-NG app, there would be a second popup waiting for me (file permissions) —> find a way to click YES
This would trigger an Android permissions confirmation —> find a way to click ALLOW
This would trigger an Android screen casting confirmation —> find a way to click START NOW


At this point, I’m able to VNC into the phone from a desktop or, comically, even another phone. I already had the phones hooked up to be able to access the NAS so I was able to quickly dump files to the network and also manually fired the backup/sync tools. Given the current state of this phone, I took this time to also:
Triple verify that VNC is set to auto-start on boot up: I don’t want to have to do this again if the phone randomly decides it wants to reboot for whatever reason
Disable all alarm clocks
Disable the lockscreen password. Note: you can still authenticate the lock screen over VNC, but given the new nature of this phone, I wanted to streamline the process
Turned off Bluetooth (to break any connections to accessories that wouldn’t really be used with this phone anymore)
Extend the display sleep time to 30 minutes (not that it really matters)
I enabled USB debugging on the phone and authorized my PC
The contenders
Before the OnePlus 7T, we previously used the OnePlus 3T and OnePlus 5 so we had an accumulation a few of the specialty chargers and cables over the years so, unless there was a monumental reason otherwise, I wanted to limit the search to OnePlus phones (or alternatively, OPPO or Realme phones if I couldn’t find a suitable option).
What’s so special about these phones?
All three brands use a proprietary charging system called ‘VOOC’ (sometimes branded as Warp-, Dash- or Dart-charge). You may have heard of USB-PD (power-delivery) or the popular Qualcomm Quick Charge; VOOC provides the same rapid-charge functionality as those other systems but instead of ramping up voltage during the charging process, it ramps up current.
All of these systems provide a means of rapidly-charging batteries but, charging via VOOC generally keeps the heat in the power brick rather than the phone (and power bricks generally can handle and dissipate heat a bit better than compact batteries in tight enclosures… The second notable advantage of VOOC charging is that the charging performance isn’t nearly as affected by what you’re doing on your phone while charging: you could charge while gaming or watching videos and the charge time would mostly be the same.
What I wanted
Must: not be stupid-priced
Must have: A phone that uses Dash/Warp/VOOC charging
Must have: A performance uplift compared to our current phone (Snapdragon 855+ with 8GB RAM)
Ideally have: some form of official dust/water resistance
Ideally have: WiFi 6 support (none of the phones I looked at yet support WiFi 6e)
Ideally have: better battery capacity than my current phone (3800mAh)
Ideally have: for cameras, not be a major step back in the main, wide and macro camera
Would be nice but not a deal breaker: 256GB storage. Apps, media etc. have really bloated over the years
Would be nice but not a deal breaker: wireless charging (I probably won’t be able to use it anyways since I use magnetic mounts)
Would be nice but not a deal breaker: dual-SIM
What was available from OnePlus at the time:
OnePlus 10 Pro - $1030 CAD
OnePlus 10T - $850 CAD (promotional pricing)
OnePlus 9 Pro - $1170 CAD
OnePlus 9 - $840 CAD
OnePlus 8 Pro - $950 CAD
Nord N20 - $380 CAD
For context, we bought the OnePlus 7T in 2020 for an absolute steal price of $350 CAD. Phone prices have definitely jumped a lot in the interim! With the exception of the Nord N20, each successive phone generally is more performant than the previous (and certainly more performant than our current phones). I threw together a quick sheet to group all of the specs that matter to me, highlighting substantial standouts:
| A | B | C | D | E | F | G | H | |
|---|---|---|---|---|---|---|---|---|
1 | OnePlus 7T | Nord N20 | OnePlus 8 Pro | OnePlus 9 | OnePlus 9 Pro | One Plus 10T | OnePlus 10 Pro | |
2 | Price available to me | Paid 350CAD | 380CAD | 950CAD | 840CAD | 1170CAD | 850CAD | 1030CAD |
3 | Year Released | 2019 | 2022 | 2020 | 2021 | 2021 | 2022 | 2022 |
4 | Last Year of Security Updates | 2023 | 2025 | 2024 | 2025 | 2025 | 2026 | 2026 |
5 | OS Support | Android 10-12 | Android 11-12 | Android 10-12 | Android 11-13 | Android 11-13 | Android 12-14 | Android 12-14 |
6 | Max Cellular | 4G | 5G | 5G | 5G | 5G | 5G | 5G |
7 | CPU | Snapdragon 855+ | Snapdragon 695 | Snapdragon 865 | Snapdragon 888 | Snapdragon 888 | Snapdragon 8+ Gen 1 | Snapdragon 8+ Gen 1 |
8 | RAM | 8GB | 6GB | 12GB | 8GB | 12GB | 16GB | 12G |
9 | Storage | 128GB | 128GB | 256GB | 128GB | 256GB | 256GB | 256GB |
10 | Storage Type | UFS 3.0 | UFS 2.2 | UFS 3.0 | UFS 3.1 | UFS 3.1 | UFS 3.1 | UFS 3.1 |
11 | Latest Wi-Fi | Wi-Fi 5 (AC) | Wi-Fi 5 (AC) | Wi-Fi 6 (AX) | Wi-Fi 6 (AX) | Wi-Fi 6 (AX) | Wi-Fi 6 (AX) | Wi-Fi 6 (AX) |
12 | Latest Bluetooth | 5 | 5.1 | 5.1 | 5.2 | 5.2 | 5.2 | 5.2 |
13 | Battery | 3800mAh | 4500mAh | 4510mAh | 4500mAh | 4500mAh | 4800mAh | 5000mAh |
14 | Wired Charging | 30W | 33W | 30W | 65W | 65W | 65W | 65W |
15 | Wireless Charging | No | No | 30W | 15W | 50W | No | 50W |
16 | Reverse Wireless Charging | No | No | 3W | No | Yes, speed unknown | No | Yes, speed unknown |
17 | USB Power Delivery | No | No | No | Yes | Yes | No | Yes |
18 | Camera - Main | 48MP f/1.6, 26mm, OIS | 64MB, f/1.8, EIS | 48MP f/1.6, 26mm, OIS | 48MP, f/1.8, 23mm, EIS | 48MP, f/1.8, 23mm, OIS | 50MP, f/1.8, 24mm OIS | 48MP, f/1.8, 23mm, OIS |
19 | Camera - Wide | 16MP f/2.2, 17mm | None | 48MP f/2.2, 14mm | 50MP, f/2.2, 14mm | 50MP, f/2.2, 14mm | 8MP, f/2.2 | 50MP, f/2.2, 14mm |
20 | Camera - Tele | 12MP f/2.2, 51mm (2X) | None | 8MP, f/2.4, 75mm (3x), OIS | None | 8MP, f/2.4, 77mm (3X), OIS | None | 8MP, f/2.4, 77mm (3X), OIS |
21 | Camera - Front | 16MP f/2.0, 25mm | 16MP, f/2.4, 25mm | 16MP, f/2.5, 25mm | 16MP, f/2.4, 25mm | 16MP, f/2.4, 25mm | 32MP, f/2.2 | |
22 | Camera - Other | 2MP, f/2.4 macro | 5MP, f/2.4 color filtering camera | 2MP, f/2.4 black & white | 2MP, f/2.4 black & white | 2MP, f/2.4 macro | ||
23 | Max Video | 4K60, 1080@240, 720@960 | 1080@30, 720@120 | 4K60, 1080@240, 720@480 | 8K30, 4K60, 1080@240, 720@480 | 8K30, 4K120, 1080@240, 720@480 | 4K60, 1080@240, 720@480 | 8K24, 4K120, 1080@240, 720@480 |
24 | Screen - Resolution | 1080x2400 | 1080x2400 | 1440x3168 | 1080x2400 | 1440x3216 | 1080x2412 | 1440x3216 |
25 | Screen - Refresh | 90 | 60 | 120 | 120 | 120 | 120 | 120 |
26 | Screen - Protection | Gorilla Glass 5 | Yes, unknown, assuming v5 | Gorilla Glass 5 | Gorilla Glass 5 | Gorilla Glass 5 | Gorilla Glass 5 | Gorilla Glass Victus |
27 | Screen - Always On Display | No | Yes | No | Yes | Yes | No | Yes |
28 | SIM Slots | 2 | 2 | 2 | 2 | 2 | 2 | |
29 | Dust Resistance | Nothing official | Nothing official | IP68 | Nothing official (on the model available) | IP68 | Nothing official | IP68 |
30 | USB Type-C | 3.1 | 2.0 | 3.1 | 3.1 | 3.1 | 2.0 | 3.1 |
31 | USB OTG | Yes | Yes | Yes | Yes | Yes | No | Yes |
To begin the elimination process:
Without even looking at prices, the OnePlus 8 Pro (released 2020 with Android 10) was out because it doesn’t really give us any more breathing room on software-support — OS support would only extend to Android 12 (no improvement) and security updates would only go another year.
I eliminated both the OnePlus 10 Pro and OnePlus 9 Pro purely on the grounds of just being too damn expensive.
The Nord N20 is a really interesting option — I would only be buying one and this would act as a stop-gap phone for Nicole until we both upgrade in 2023. At that time, I would end up buying two identical phones during the upgrade cycle because I don’t really want to maintain two separate hardware platforms. I ended up not going this route because it’s simply too much money for such a drop in everything across the board especially knowing that I would be spending big-bucks in less than year’s time.
The OnePlus 10T has some controversy with it:
The elimination of the much beloved alert slider (not a big deal for me — on all my phones, I set the alert slider once when I get the phone and never touch it again
For 2022 as a flagship-tier phone, the camera situation is … peculiar. I find, for the types of things I need to take pictures of, I primarily use the wide-angle camera which takes a 50% resolution hit compared to my current phone. I know ‘megapixels aren’t everything’ but if I’m going to pay that much money for a phone, I’m not really keep for that kind of a compromise
But comparing the OnePlus 10T against the OnePlus 9 is an interesting dilemma; for what is essentially the same price, the OnePlus 9 is probably the better phone but the OnePlus 10T gives me a longer runway before I have to revisit getting a new phone. At the time, the pricing of the 10T was with a limited time launch-promo (get the higher-spec variant for the lower-spec-price). There was no way I was entertaining this when the promotion ended.
Overall, I just didn’t like any of these options.
Enter: the refurb market...
Not liking any of the options I found: they were way too pricey and/or had way too many compromises, I started looking at the refurbished market (I wasn’t about to touch the used-market with a 10ft pole!) This ended up being a great idea as it gave me some options:
Again, throwing these into a spreadsheet:
| A | B | C | D | E | F | |
|---|---|---|---|---|---|---|
1 | OnePlus 7T | OnePlus 8 | OnePlus 8T+ | OnePlus 9 | OnePlus 9 Pro | |
2 | Price available to me | Paid 350CAD | 380CAD | 450CAD | 510CAD | 640CAD |
3 | Year Released | 2019 | 2020 | 2020 | 2021 | 2021 |
4 | Last Year of Security Updates | 2023 | 2024 | 2024 | 2025 | 2025 |
5 | OS Support | Android 10-12 | Android 10-12 | Android 11-13 | Android 11-13 | Android 11-13 |
6 | Max Cellular | 4G | 5G | 5G | 5G | 5G |
7 | CPU | Snapdragon 855+ | Snapdragon 865 | Snapdragon 865 | Snapdragon 888 | Snapdragon 888 |
8 | RAM | 8GB | 8GB | 12GB | 8GB | 12GB |
9 | Storage | 128GB | 128GB | 256GB | 128GB | 256GB |
10 | Storage Type | UFS 3.0 | UFS 3.0 | UFS 3.1 | UFS 3.1 | UFS 3.1 |
11 | Latest Wi-Fi | Wi-Fi 5 (AC) | Wi-Fi 6 (AX) | Wi-Fi 6 (AX) | Wi-Fi 6 (AX) | Wi-Fi 6 (AX) |
12 | Latest Bluetooth | 5 | 5.1 | 5.1 | 5.2 | 5.2 |
13 | Battery | 3800mAh | 4300mAh | 4500mAh | 4500mAh | 4500mAh |
14 | Wired Charging | 30W | 30W | 65W | 65W | 65W |
15 | Wireless Charging | No | No | No | 15W | 50W |
16 | Reverse Wireless Charging | No | No | No | No | Yes, speed unknown |
17 | USB Power Delivery | No | No | No | Yes | Yes |
18 | Camera - Main | 48MP f/1.6, 26mm, OIS | 48MP f/1.6, 26mm, OIS | 48MP f/1.6, 26mm, OIS | 48MP, f/1.8, 23mm, EIS | 48MP, f/1.8, 23mm, OIS |
19 | Camera - Wide | 16MP f/2.2, 17mm | 16MP f/2.2, 14mm | 16MP f/2.2, 14mm | 50MP, f/2.2, 14mm | 50MP, f/2.2, 14mm |
20 | Camera - Tele | 12MP f/2.2, 51mm (2X) | None | None | None | 8MP, f/2.4, 77mm (3X), OIS |
21 | Camera - Front | 16MP f/2.0, 25mm | 16MP, f/2.4, 25mm | 16MP, f/2.4, 25mm | 16MP, f/2.4, 25mm | 16MP, f/2.4, 25mm |
22 | Camera - Other | 2MP, f/2.4 macro | 5MP, f/2.4 macro | 2MP, f/2.4 black & white | 2MP, f/2.4 black & white | |
23 | Max Video | 4K60, 1080@240, 720@960 | 4K60, 1080@240, 720@480 | 4K60, 1080@240, 720@480 | 8K30, 4K60, 1080@240, 720@480 | 8K30, 4K120, 1080@240, 720@480 |
24 | Screen - Resolution | 1080x2400 | 1080x2400 | 1080x2400 | 1080x2400 | 1440x3216 |
25 | Screen - Refresh | 90 | 90 | 120 | 120 | 120 |
26 | Screen - Protection | Gorilla Glass 5 | Gorilla Glass 5 | Gorilla Glass 5 | Gorilla Glass 5 | Gorilla Glass 5 |
27 | Screen - Always On Display | No | No | Yes | Yes | Yes |
28 | SIM Slots | 2 | 2 | 1 | 2 | 2 |
29 | Dust Resistance | Nothing official | Nothing official | IP68 | Nothing official (on the model available) | IP68 |
30 | USB Type-C | 3.1 | 3.1 | 3.1 | 3.1 | 3.1 |
31 | USB OTG | Yes | Yes | Yes | Yes | Yes |
With these price points, the options become exciting (and viable) again!
The OnePlus 8 for the absolute lowest-cost
The OnePlus 8T becomes the budget option that sneaks in [official] dust- and water-resistance
The OnePlus 9 is still a bit of an odd child that arguably is a bit worse than the 8T but gives you a +1 year on the support runway — with a small premium of $60 CAD, that was fair
The OnePlus 9 Pro being the least compromises option
Unlike the online/new/retail pricing, the refurbished pricing separates the products with meaningful price jumps/drops. Deciding between the OnePlus 8T and the 9 Pro was a bit of a challenge: I ended up going with the One Plus 9 Pro. I figured the price premium for it is justified by the extra support runaway and having better specs all around.
So how was the refurbished experience?
That’s the one uncertainty of going with refurbished products. In theory, it should be fine, but there’s always a gotcha! I specifically with Amazon Renewed as a bit of a safety net (on top of the ease of returning things as a Prime member) for easy of returns if anything was even a bit out of place. The presentation of the Renewed program is pretty enticing:
The phones arrived the next day in generic boxes without any visible damage of any kind - they even came with a OnePlus (30W) charger and cable! I was expecting a generic phone charger so this was a great surprise. Both phones powered up fine and, as advertised, were both carrier-unlocked (to be fair, I was only able to test connectivity with the Telus network, but the phones did indicate they were network-unlocked). I was expecting this to be a walk in the park - I’d spend a couple hours tinkering and Nicole would have her phone up and running in no time.
Am I foreshadowing too much?
No plan survives contact with the enemy...
The first clue that something might be amiss was seeing the specific model was the LE2127 — this is the T-Mobile variant although initially I wasn’t phased by this. After all, our current phones (HD1907) were also T-Mobile variants and I didn’t have any major issues with it: the phone shipped with the normal Oxygen OS operating system and I was able to take updates just fine. At this point, the only thing that I knew was that the T-Mobile variant was a single-SIM model only; this was only a small disappointment rather than anything earth shattering.
When I sat down to start running the phone through the gamut of setup tasks, I rebooted it and finally saw what I had missed on the first boot-up. I would have been totally okay with having a jarringly bright-pink splash screen on boot-up, if the OS that booted up was Oxygen OS (the OS that comes with OnePlus phones). Nope. It was a T-Mobile bastardized version of the OS that would only accept updates provided by T-Mobile. This had to go.
This is very much ‘standard phone setup’ for me so at this point, I’m irked but not concerned:
Install drivers and pre-requisites
Enable Developer Options and turn on USB debugging and OEM unlocking
Reboot to the bootloader and unlock it. This wipes the phone
After the phone comes back, redo step 2 (because the phone was wiped)
Reboot to the bootloader and flash a temporary root environment
Sideload Magisk and root the device permanently
Sideload Oxygen Updater and do a local update to the latest OS
Once you’re done all of this, now you can log into the phone and setup/restore your apps etc.
A jarringly bright bootup screen!
When I jumped into the bootloader, I saw a message I haven’t seen in forever:
> fastboot oem unlock
FAILED: (remote: 'Please flash unlock token first.')
fastboot: error: Command failed
Thinking I had somehow forgotten to enable OEM unlocking and annoyed, I rebooted into the OS and saw that I hadn't forgot to do this at all: OEM unlocking was enabled. Despite the ‘OEM unlocking’ setting being set to ON, this was not going to be an easy-peasy setup. Turns out there’s a huge dance you’re “supposed” to do.
First, get the unlock code
> fastboot oem unlock(bootloader) Serial Number:
(bootloader) ====================================
(bootloader) [8-character-string]
(bootloader) ====================================
(bootloader) Unlock code:
(bootloader) ====================================
(bootloader) [32-character-string]
(bootloader) [32-character-string]
(bootloader) ====================================Now go to the unlock website
- Fill in your IMEI, serial number (- thats the 8-character string) and the unlock code. It's not eimmediately obvious but you have to combine the two 32-character-strings into a single 64-character code
- Wait 7-14 days and they will/may get back to you with an unlock code of some sort, I'm not entirely sure.
- You're supposed to save the unlock code as a file (i.e., unlock_token.bin)
- Now you can unlock the right-to unlock your bootloader:
> fastboot flash cust_unlock unlock_token.bintarget reported max download size of [SOMENUMBER] bytes
sending 'cust-unlock' (0 KB)...
OKAY [ 0.005s]
writing 'cust-unlock'...
(bootloader) Device is unlocked. OKAY [ 0.005s]
finished. total time: 0.010s - And now you can unlock your bootloader:
> fastboot oem unlock...
OKAY [ 0.025s]
finished. total time: 0.026s
That’s right. You are expected to wait 7-14 days to do something that should take milliseconds to do. And this is one of the easier options! Some carriers don’t even provide this and some other brands (i.e., Samsung, LG) may not even allow unlocking of the bootloader period.
OnePlus 9 Pro (T-Mobile) setup, start to finish
On the off chance you stumbled on this page trying to set up your OnePlus 9 Pro, the following is a fairly complete documentation of everything I needed to do to get the phone into an acceptable state. There wasn’t a chance in hell I was going to wait for T-Mobile to get back to me with the unlock code — we’re going bypass all of this. If you’re following along, you’ll need two things:
A Windows PC and
To accept that your phone will get wiped and it’s possible for things to go really wrong!
At a high level, I need to do a few things:
Replace the T-Mobile OS with Oxygen OS by any means necessary (reference XDA thread)
Get the phone rooted (reference XDA thread)
Get call recording setup (reference GitHub repo)
Finish setting up the phone
Fix any stupid-behavior or quirks as I encounter them
[01] Prerequisites
Basic Connectivity
You’ll want to download a few things before we get started:
Download the latest Android SDK Platform tools. Extract them somewhere; for this example, we’ll use C:\android-platform-tools
Download and install the OnePlus drivers. If Windows update doesn’t sort you out, you can get some drivers from here
Download and extract the Google USB driver
Download the Qualcomm USB drivers. I got mine from here. Extract this somewhere
Before we continue on, we need to prepare a few things:
Plug your phone in now, select File Transfer / Android Auto as the USB connection mode
If there is a missing driver in Device Manager, point the drivers to the OnePlus drivers you installed above. You should be able to open My Computer and navigate into the phone’s internal storage without issue
Enable Developer Options. On normal phones, you’d tap on Build Number a bunch of times, but for the T-Mobile, you’ll need to tap on Software Version
In Developer Options, enable the following settings:
OEM Unlocking
Advanced Reboot
USB Debugging — if your phone is plugged in at this point, you will get a confirmation if you want to trust the RSA thumbprint (of the computer); go ahead and check the box and trust it
Verify ADB Works
Open command prompt and navigate to the platform tools you extracted earlier (C:\android-platform-tools). Run adb devices and you should see a single device listed. Keep this command prompt window open until we are all done this guide.
> adb devices
[8-character-string] device
Verify Fastboot Works
Go ahead and run the command adb reboot bootloader. This should reboot the phone to a scary looking screen. Check Windows Device Manager to verify that there aren’t any devices that are missing drivers. If you need drivers, use the Google USB driver you grabbed earlier (or you can also get this from Windows Update —> Optional Updates —> Driver Updates)
OnePlus 9 Pro at the bootloader screen
Run the command fastboot devices and this should also return a single device listed
> fastboot devices
[8-character-string] fastboot
You can either press the power button or run fastboot reboot to reboot the phone back to the normal desktop
Verify EDL Works
Getting your phone into EDL mode can be a bit tricky and since the screen is off, there isn’t an easy confirmation that you did it right. Before we get started, you’ll want to have Windows Device Manager open and have easy access to the Qualcomm Drivers you extracted earlier.
Power the phone off
Leave the USB cable plugged into the computer and unplug it from the phone
Hold down the volume-up and volume-down buttons simultaneously. I hold mine down for a 3-count before proceeding. Do not let go of these buttons yet
While still holding the volume-up and volume-down buttons down, plug the USB cable into your phone
Continue holding the volume-up and volume-down buttons for a 2-count and then release them
If you did everything right, the screen will not turn on. Quickly go to Device Manager, and check for devices that might be missing drivers — should be named QHSUSB_BULK or similar. Point it at the Qualcomm drivers you extracted earlier. Once the drivers install, the device should now be recognized as Qualcomm HS-USB QDLoader 9008.
To get out of this special mode, I held the Volume Up and Power button for 15-seconds. Once you’ve verified that EDL works, we can actually get started!
[02] Converting to EU and unlocking the bootloader
Disconnect your phone from the computer and power off your phone
As per the post, download the two files we will need
Conversion package (MD5: 8CC3E5E81D15E28BB10DC5F1E7BD4133). Extract this to a folder somewhere
T-Mobile modems (MD5: 1F23347CA9E2924EC4E9D67982857732). Extract the file to our platform tools folder, C:\android-platform-tools
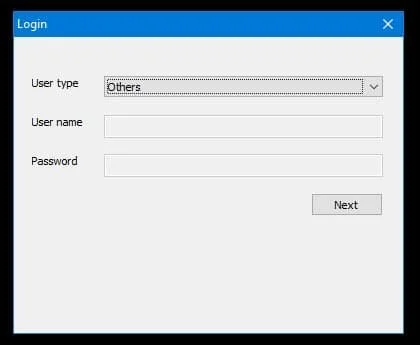
From the conversion package, run MsmDownloadTool V4.0.exe. It takes a moment to launch so be patient!
Once it launches, you will be presented with a login dialog, select Other and click Next to continue
Once you have logged in, the main application will launch. Click Start to set the application in listening mode. By putting the application in listening mode, once the phone connects, the application will start to do it’s thing without any further interaction from the user
Confirm with yourself that you want to continue
Do the funky volume-up and volume-down button-press thing to get the phone into EDL mode and connected to the computer. If you’re successful, the MSM application will detect it and do it’s thing all on its own. If you miss the timing and the phone just boots up normally, go ahead and power down and try again
Walk away for 10 minutes and let the MSM application do it’s thing. The phone will reboot automatically when it’s done: you’ll come back to a “Welcome to Android” wizard
Once you’ve successfully got to the “Welcome to Android'“ wizard, go ahead and click Stop in the MSM app and then you can close the app


At this point your phone is has been converted to an EU edition of the phone (which is a good thing). You no longer have a locked bootloader and you can now get all of the updates that have been available for a long time (and not ‘approved’ or made available by T-Mobile).
Go ahead and finish the Welcome to Android wizard — just do the bare minimum to get to the desktop. Don’t get too excited and go and log into the phone and install apps or anything — we’re going to be wiping the phone at least once more so you’ll have to do this all over again.
Connect to Wi-Fi or cell
Disconnect and reconnect your phone to the computer and select File Transfer / Android Auto as the connection mode
Enable Developer Mode and turn on:
OEM Unlocking
Advanced Reboot
USB debugging (and re-authorize your computer)
In the command prompt dialog, reboot to bootloader using adb reboot bootloader
**\> fastboot oem unlock**
>...
OKAY [  0.025s]
finished. total time: 0.026s
You will be prompted on your phone on whether you want to proceed or not - unlocking will wipe all data on the phone. Go ahead and confirm to continue. The phone will self-wipe and reboot on its own.
After the phone finishes and reboots, complete the ‘Welcome to Android’ wizard again. You know the drill by now:
Connect to Wi-Fi or cell
Disconnect and reconnect your phone to the computer and select File Transfer / Android Auto as the connection mode
Enable Developer Mode and turn on:
OEM Unlocking - this time confirm that you can’t toggle this because the bootloader is already unlocked!
Advanced Reboot
USB debugging (and re-authorize your computer)

Eesh. All this work for something that should have been easy peasy…
The last thing we need to do now is to restore the T-Mobile modem. In the command prompt dialog, reboot to bootloader using adb reboot bootloader and run the following commands:
> fastboot flash modem_a NON-HLOS.bin
Sending 'modem_a' (214892 KB)          OKAY  [4.992s]
Writing 'modem_a'          OKAY [0.614s]
finished. total time: 5.628s
> fastboot flash modem_b NON-HLOS.bin
Sending 'modem_b' (214892 KB)          OKAY  [4.992s]
Writing 'modem_b'          OKAY [0.693s]
finished. total time: 5.709s
Now you can reboot your phone by pressing the power button or running fastboot reboot.
[03] Updating the phone via OTA
Now that you have a real OS that can get the widely available updates, we’re going to want to go ahead and get the phone updated to latest:
Connect to Wi-Fi
Use the built-in updater (Settings —> About Device) to go ahead download and install the updates. After each update finishes, you’ll need to restart
After each update, reboot into the bootloader via adb reboot bootloader
Flash the modems:
fastboot flash modem_a NON-HLOS.bin
fastboot flash modem_b NON-HLOS.bin
Reboot back to the desktop using the power button or fastboot reboot
Once you’re back to the desktop, check the current build version — we’ll want to stop when we get to 11.2.10.10 — this is the last Android 11 update.
Stop before updating to Android 12
If you’re not paying attention to the exact version numbers, at some point, during one of the updates, you should get a caution prompt ‘the update you’re about to apply is a major update’. That update is the update to Android 12.
Don’t apply the update yet, go do the next step first,
[04] Preparing for Android 12
Prerequisites
Once you’re on version 11.2.10.10, the next update will push us to Android 12 and there are a few things we’ll want to do in preparation. On your computer
Download the last Magisk installer from here
Download a root checking application from here
Download the latest Oxygen Updater from here
This Untouched/Magisked (BA) package for version 11.2.10.10 (MD5: 936F2D6C5ABB19908DD20AEFA5AFF052). From this archive, extract the magisk_boot.img file to the platform tools folder, C:\android-platform-tools. If you find yourself on a slightly different version than 11.2.10.10, have a look at this XDA thread, you may be able to find a matching package — just remember to look for the ‘BA’ variant since this is now an EU phone.
Side load the applications:
Connect your phone to the computer for file-transfer
Copy the APKs to your phone (the \Downloads folder is fine)
Using a file manager like Google Files, navigate to that folder and run those APKs to install them (you’ll be prompted to grant rights to access that folder as well as perform the installation)
Booting to Temporary Root
[Optional] Using the root checker app, verify that we don’t have root
Using the command prompt dialog, reboot to the bootloader: adb reboot bootloader
Once you get to the bootloader, we can go ahead and reboot into a temporary rooted-environment
> fastboot boot magisk_boot.img
Sending 'boot.img' (98304 KB)          OKAY  [2.300s]
Booting           OKAY [0.280s]
finished. total time: 2.708s
Once you’re back in the desktop, you can use the root-checking application to confirm that you have root — you’ll get a prompt asking you for root permissions (you’ll need to grant it for toot to be detected)


Getting Permanent Root
The phone only has root until it reboots — and we have a lot more rebooting to do! To get permanent root we need to do the following:
Launch the Magisk app
In the first box, ‘Magisk’, click Install
You will get some options, choose Direct Install (Recommended)
Once it finishes, go ahead and reboot
Once you’re back, run the root checking application to confirm that you still have too
Fixing the Modems
On this XDA thread, download the Data_Retain.zip attachment. Copy this to your phone
Launch the Magisk app
At the bottom, select the Modules tab
Click Install from storage and install the Data_Retain.zip attachment
After the package is flashed, go ahead and reboot
[05] Major update: moving to Android 12
Using the system update (Settings —> About Device), go ahead and apply the major update (at the time of writing, the version number of the update happened to be 11.C.47_1470_202203102117).
DO NOT REBOOT AFTER THE UPDATE.
After the update completes, we need to apply root to the new OS:
Launch the Magisk app
In the first box, ‘Magisk’, click Install
Select Direct Install (Recommended) —> DON’T REBOOT
Go back and select Install to Inactive Slot (After OTA). It will prompt you that you’ll need to reboot for it to take apply. Continue with the installation
Now you can reboot
After you’re rebooted, go ahead do some quick checks
Verify the OS is Android 12
You may need to re-enable developer mode and/or re-enable the USB Debugging setting
Verify that you still have root
Once that’s done, download the local update application from here (MD5: ADF932B2FD4C2A2B379C9427197B6B6A) and copy it to your phone and install it. This is needed because OnePlus decided to remove the ability to do local updates with their Android 12 OS. This APK restores that functionality.
[06] Doing updates on our terms
These steps are the process I use for long term maintenance of the phone. At a high level: grab latest package from Oxygen Updater —> Update (don’t reboot) —> Preserve root —> Reboot.
Launch the Oxygen Updater application. If it’s your first time running the application, walk through the wizard; make sure that your device is set to OnePlus 9 Pro (EU) and that you’ve selected the Stable (full) updates. Once finished, go ahead and download the latest update. At the time of writing this was 11.C.62_1620202206251349.
If this is your first time, make rough note of the file size and the filename of the update. In my case, the filename was b906713f52384ca3b1f64eaa36c6db0c.zip and was 4.16GB
Once the download is complete, you can close the app and System Update application
Click the gear in the top right corner to perform the update —> DON’T REBOOT
As before, launch the Magisk application
Select Direct Install (Recommended) —> DON’T REBOOT
Go back and select Install to Inactive Slot (After OTA). It will prompt you that you’ll need to reboot for it to take apply. Continue with the installation
Now you can reboot
After the reboot, you can confirm that your phone has the expected version
Now you can delete the downloaded update using any means you want (either from a file manager on the phone, or you can connect to a computer and delete it that way). The update will always be in the root path of the phone and will always be a .zip file that matches what you noted in Step 2.
Now to fix all the dumb...
Now, I’m ready to log into the various services (Google account etc.) and get the phones setup. In the brief time I spent setting up the phones, I’ve found a few really dumb things with Android 12; most of these stupid changes are pushed down by Google, but some of it from the OnePlus implementation of Android 12 (or possibly made worse).
-
We already fixed this above but for reasons unknown, OnePlus removed the ability to perform local OS upgrades.
Fix: download this (MD5: ADF932B2FD4C2A2B379C9427197B6B6A) and install it. This will create a shortcut in your launcher called ‘System Updater’.
-
OnePlus is now using a strictly-Google phone stack (phone, contacts, messaging apps). I don’t mind the messaging app but the phone/contacts app is horrendous - says me, someone who averages one call a year - maybe. As an additional nuisance, the Google phone app mangles support for call recording as well. So it’s ugly and nonfunctional.
I really tried to find a way to not use third-party phone/dialer apps, but after spending a couple hours trying to brute force a pre-Android 12 dialer app into Android 12, I just gave up and settled for something that would be simple and clean.
I settled on Simple Dialer and it lives up to its namesake.
-
The pre-Android 12 OnePlus dialer supported call recording and while it was a bit kludgy to get setup initially, once set up (requiring a Magisk module to activate), sonce setup it just worked.
The Google dialer supports call recording — but only for certain locales as determined by Google. And the recording has all kinds of issues depending on whether or not the screen has gone to sleep (i.e., because you raised the handset to your ear) before the call has connected or not.
I ended up going with a dialer-agnostic recorder, ‘Basic call Recorder’. Installation is super straightforward: using Magisk, flash the zip package. OnePlus devices need one extra step: extract the APK embedded in the zip and install that as well.
Note: if you’re going down this route, it’s probably a good idea to double check the laws in your area regulating this.
-
Android 11 introduced a really cool thing to the long-press Power Menu — the ability to add smart-home shortcuts there! Think of having a button right there for interacting with any of your Google Home devices! (link). Since this was such a great feature, the natural thing to do was to remove it in Android 12.
I feel like this problem may be magnified by the OnePlus OS skin: I can see the old power menu controls but when I go to try and add controls, it just refuses to let me.
Fix: Install Classic Power Menu which replaces the OS power menu where I can customize some of the reboot options available. The headline feature however, is that it brings back the smart-home controls to this menu. I disabled the entry for Google Pay/Wallet since that’s not supported by my bank in Canada anyways.
This app uses the Accessibility service to hijack the power-button long-press event to display its own custom view and because of this reliance on the Accessibility service, there is a delay — you see the stock power menu for 100ms or so and then the override kicks in. The author provides a way to avoid this delay using an XPOSED module, but I couldn’t get it to work at all when the module was active. This feels like an OxygenOS thing so maybe I’ll revisit this in a few months. For now, I can live with the slight delay.
-
Android 12 dropped support for anything but IKEv2 VPNs which, really, isn’t a bad thing per se, just an inconvenient thing - it’s super awesome to just have an L2TP VPN baked into the pulldown menu that I can very quickly access.
On my networking side, it looks like support for this is coming/already-here; it just happens that my specific equipment isn’t supported yet. Something to look forward to I suppose.
In the meanwhile, the workaround is to reconfigure my network to use OpenVPN. On the phones, I can create two easy shortcuts “VPN ON” (which auto connects the specific OpenVPN profile) and “VPN Off”. There’s only one caveat (so far) of not being able to access my custom private-DNS provider whilst on VPN, but [a] that’s a fairly minor inconvenience and [b] technically can be circumvented by toggling the private DNS provider.
Not enough excitement
Because all of this complexity and hoop jumping wasn’t enough fun, I managed to [accidentally] self-sabotage myself. The best part is that this happened after I had got the phone updated to the latest Android 12 - I was ready to finally log into my Google account and get apps installed etc. I was going to call it a night (it was 4AM) before tackling the apps in the morning so I did one final reboot just sanity check that I was in a good state.
And the phone refused to boot: it was stuck on the very first power-on screen (before the OS starts to boot) with a Qualcomm crash-dump. It struggled to even load the Android Recovery environment - the only environment that it would load with any kind of consistency was the bootloader.
I’m not sure what exactly happened but this is what I think happened:
After updating to Android 12 (and doing multiple reboots in the process), I did one last reboot. This was while the phone was plugged into the computer
While it rebooted, I unplugged the phone to bring it closer to me
Somehow during that reboot, the phone kicked into EDL mode
I still had the MSM app running in the background in listening mode. After all, to my understanding, the app would only do it’s thing if you went through the annoying process to get the phone into the special EDL mode
Unbeknownst to me, the phone was in EDL mode and the MSM app started to brute force rewrite the phone
And with perfect timing, I disconnected the phone from the computer
Thankfully, I was able to get the phone back into EDL mode and brute force the entire process again (starting essentially from scratch again).
This is why in my steps above, I explicitly state that after the MSM app has finished, you should (at the least), stop it. Better yet, exit the application to completely remove the possibility of this happening.
Looking Back
Was it worth it?
Out of the box, the hardware was fine - great even, considering I got OnePlus chargers when I was expecting generic no-name chargers. The phones appear to be in excellent condition and there was only one oddity I noticed: that the phones (while in T-Mobile mode) refused to take updates (that were pushed by T-Mobile). I recall trying it twice, on each phone: downloading the nearly 4GB update, installing, rebooting and then being presented with the same update again as if it didn’t take.
To answer the question, given that I broke the phones into submission, absolutely it was worth it. The underlying hardware is plenty good and I get the phones to do what I want and how I want it and at a fairly ‘great’ price. There some hairy moments where I wasn’t sure if I was going to be dead in the water with a locked bootloader or if the phone was going to even boot (see: excitement); it was hella frustrating to have to redo everything more than few times as I stumbled along but I eventually got the phones broken down into submission.
If I had to use the phones without breaking them into submission (even assuming that I was able to get the officially supported OS updates working)? Probably not for two reasons
T-Mobile is particularly lackluster on getting updates out in a timely fashion (this isn’t just a T-Mobile things, all carriers are abysmal at it)
It doesn’t matter what kind of a deal I got with the phones - if it doesn’t do the things I want, then it’s no good to me at all
But this is me. Everyone is different - perhaps it’s not as big a deal if you’re just using a phone for Instagram-only.
If I had bought the phone directly from OnePlus, then all of this hassle wouldn’t have really mattered — I’d be able to [easily] unlock the bootloader and be on my way. The downside of course is paying nearly twice the price.
Rage against the industry
While this particular phone happens to exhibit problems associated with T-Mobile, they are by no means alone in this. All carriers (in North America it seems) are really, really bad about it. I think toxic might be a better word to describe it. A phone is just a thing that happens to operate a network that provides connectivity. Imagine if your washer-dryer could only receive power from the outlet if you bought the washer-dryer from an appliance store associated with power company A. Or if you were building something but your none of your screws would since into wood because your screwdriver wasn’t the same brand.
I’m not sure about other parts of the world, but in Canada, I can’t even [easily] walk into a store and buy a phone plain and simple. No account, no plan, just pay for hardware and walk out. “Sorry you need to have a plan”. The sheer hoops that people have to jump through to change carrier is nightmarish. Locked SIMs, locked bootloaders, all of it is so anti-consumer.
Root/Jailbreak is ‘dangerous’
This is an amusing one and while it’s not completely false - yes, if you root/jailbreak your phone and then do certain things, you can do bad things. I get that, there’s some truth to that. But how many times have people run into a problem with a computer — an objectively ‘higher tier’ device and the ‘solution’ is “Oh! you need to run as administrator” or “you need to sudo command”. Nobody blinks an eye when you have to sudo/Administrator something on a computer but on a phone? It’s doom and gloom.
And the audacity to try and limit things because you’re rooted/jailbroken? Try logging into a bank website on a computer browser with admin privileges. Huh - you can do it. No fuss. Try connecting a bank app on a rooted device and you get warnings of doom and gloom. This is from ‘reputable’ companies like banks which have such a focus on security that your password has to be a whopping 8-characters long and if you’re lucky, they’ll even make you use upper and lower case characters. /s
There ought to be hoops to jump through to root/jailbreak your device: unwary users can cause problems with their devices and these users tend to be the vocal ones but at the end of the day, phones are just hardware. No, I don’t have a solution for this that doesn’t end in ‘ban stupid users’. I’m glad OnePlus/T-Mobile does come with a mechanism to unlock the bootloaders but there’s no functional reason in the world that shouldn’t be an automated system with a 12-hour turnaround.
If I had bought the phone from OnePlus directly, this wouldn’t have been a problem and I could have just click-clack-presto, bootloader unlocked. OnePlus doesn’t care if I unlock the bootloader and they are the ones making the phone. Why the hell does a carrier, which is nothing more than a glorified sales/middleman care so much? I am grateful that, at least, this is a possibility even if it is a huge PITA. There are some brands (Samsung, LG: I’m looking especially at you) that lock it down at the manufacturer level.
Phones software is fairly indestructible
With the ‘excitement’ of nuking my phone when I was practically at the finish line, I’ve realized that the term ‘bricking’ is way, way, waaaaayyy overused and in fact, phones are much more resilient than people think. Sure, you might need specialized software, skills and/or experience to recover from that scenario but counterpoint: suppose something falls on your windshield and it’s a spidery cracked mess — you wouldn’t say “this car is now a write-off because I can’t personally fix it”.
I’ve noticed that there is a trend to say ‘hard bricked’ and ‘soft bricked’ to try and differentiate between actually totally making a device permanently ruined versus “I screwed something up”.
Why didn’t I go with the screen repair route?
The cost of just the hardware (screen, AMOLED, digitizer) would depend on the just what components needed to be replaced - I knew it was more than just the glass ($30) as the AMOLED had leaked everywhere and the touch functionality was lost on 98% of the screen, pushing the minimum parts-cost to $100 and likely closer to $300. Given that we paid 350 CAD for ours new (and could get a refurbished OnePlus 7T for 330 CAD at the time, it just didn’t make money sense to go down that road.
Product links may be affiliate links: MinMaxGeek may earn a commission on any purchases made via said links without any additional cost to you.